While not officially a series, I’ve done a few posts now on how to use CSS to modify some of the out-of-the-box experiences within PowerApps Portals. This week, I’ll show you show to convert the dropdown used to select the current view for an Entity List into tabs.
As with many of my blog posts, this questions was first asked on this thread on the Microsoft Dynamics 365 Community forums.
Specifically:
I have to apply multiple views in multiple tabs in portal CRM. Of course, we can use multiple views in entity list but it comes in vertically, here I need to show all the views in a tab format like Active Cases in one tab, Inactive Cases in other tab, so on in a horizontal format below have shared.
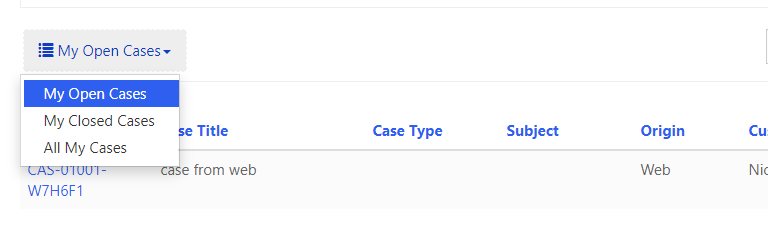
This is the dropdown that the original poster is looking to change:
As mentioned, I’ve covered why I prefer using CSS instead of JavaScript in a previous post, and I’ve implemented a similar solution for removing dropdowns as well.
PowerApps Portals is built using Bootstrap (v3), including the dropdown that we are looking to modify, so the markup for the out-of-the-box implementation is well known. If you’re not familiar, it is easy to inspect using your favourite browser’s developer tools. Since it uses <ul> tags to represent the options in the dropdowns, which also work well for tabs, our job is pretty simple.
First, we want to hide the area that shows the currently selected view. This can be done with the following CSS class:
.view-toolbar .view-select .selected-view {
	display: none;
}
As you can see, we’re targeting the selected view element inside the Entity List’s toolbar and hiding it with display: none;.
Next, we want to always show the options in the dropdown list (which are usually only shown when the user clicks on the dropdown.
.view-toolbar .view-select .dropdown .dropdown-menu {
	position: relative;
	display: block;
}
This code sets the positioning to be relative (overriding the absolute positing that allows the dropdown to hover over other elements), and forces it to be displayed at all times using display: block;.
Finally, we want the options to appear horizontally, instead of vertically:
.view-toolbar .view-select .dropdown .dropdown-menu li {
	display: inline-block;
}
The default Bootstrap behaviour for those elements is to be shown one per line – the inline-block rule forces them to appear beside each other.
All combined, we get:
.view-toolbar .view-select .selected-view {
	display: none;
}

.view-toolbar .view-select .dropdown .dropdown-menu {
	position: relative;
	display: block;
}

.view-toolbar .view-select .dropdown .dropdown-menu li {
	display: inline-block;
}
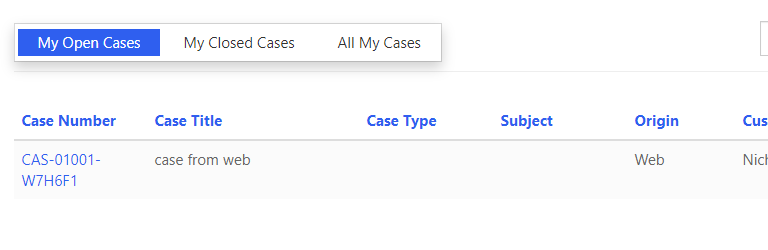
With this code implemented, we now get:
Depending on how you wanted the tabs to look, you could add further CSS classes. If you’re using this on a production deployment, you might also want to think about how this will work on mobile devices.

Simply awesome
Hi Nicholas,
Thank you for posting it.
Could you please guide me on how do you define or know what class was used for the dropdown, where are your code coming from. Specifically you wrote above: by CSS class “.view-toolbar .view-select .selected-view”.
I am beginner, and any of your help is appreciated.
Thank you.
Hi! Unfortunately those types of classes are generally not documented, so your best bet is to use your favorite browser’s developer tools (https://developer.mozilla.org/en-US/docs/Learn/Common_questions/What_are_browser_developer_tools) to inspect what is on the page.
Nick
Hi Nicholas,
I have been reading your so many blogs and I want to thank you for each of them. The knowledge you share is simply awesome and your style of presentationis also simple and easy to understand.
Really appreciate the hardwork you put in into these blogs.
You are Power Apps Portal rockstar.
Thanks & Regards
Nayeem
Hi Nicholas,
I have been reading your so many blogs and I want to thank you for each of them. The knowledge you share is simply awesome and your style of presentationis also simple and easy to understand.
Really appreciate the hardwork you put in into these blogs.
You are Power Apps Portal rockstar.
Regards
Nayeem
It really works, but in the case when there is only one view – view name does not appear.
Hi Nicholas,
This blog is very helpful. I tried that , and that is working . but I want some more function , I want to divide subgrid header into two horizontal rows and want to display search button in second row .Is it possible?