
 Hourly Consulting
 Maintenance
 Training
 Implementation
 Microsoft Power Pages
 D365 & Power Platform
 Websites & Web Applications
 Blog
Blog
 Power Pages Tips
 Portals Community Call

Power Pages: Data Change Request Architecture
A few months ago I put out a tip on our YouTube Channel called Data Change Request Architecture, where I described how, for critical data, instead of allowing users to directly edit their information in Dataverse, I prefer to create an additional table where the user creates a change request row. Then, once approved, the changes are made to the primary rows in Dataverse. In this post, I’m going to walk through one way to do that, using JavaScript and Liquid to enhance the user experience a little bit.
Category:
Profile Update
The scenario we’ll look at is allowing a user to update their own contact record. Power Pages does come with an out-of-the-box Profile page, however it doesn’t use the standard Power Pages Forms functionality, so on many projects, we choose to replace that page with our own Power Pages Form.
Consider a situation where Power Pages is being used for something where the identity of the contact is critical. Perhaps it is a portal used for legal matters, and so one of the business processes to onboard a contact to the portal includes verifying the identity of the contact. Once that is done, we don’t want the contact to be able to change basic details about themselves, like their first and last name, without going through an approval process. Otherwise, they could change the name to someone completely different, and the profile would no longer represent the original person.
In this case, we want the profile information to be viewable to the logged in user, but if they want to change it, they need to submit a request that is verified before the contact record is changed.
Custom Profile Form
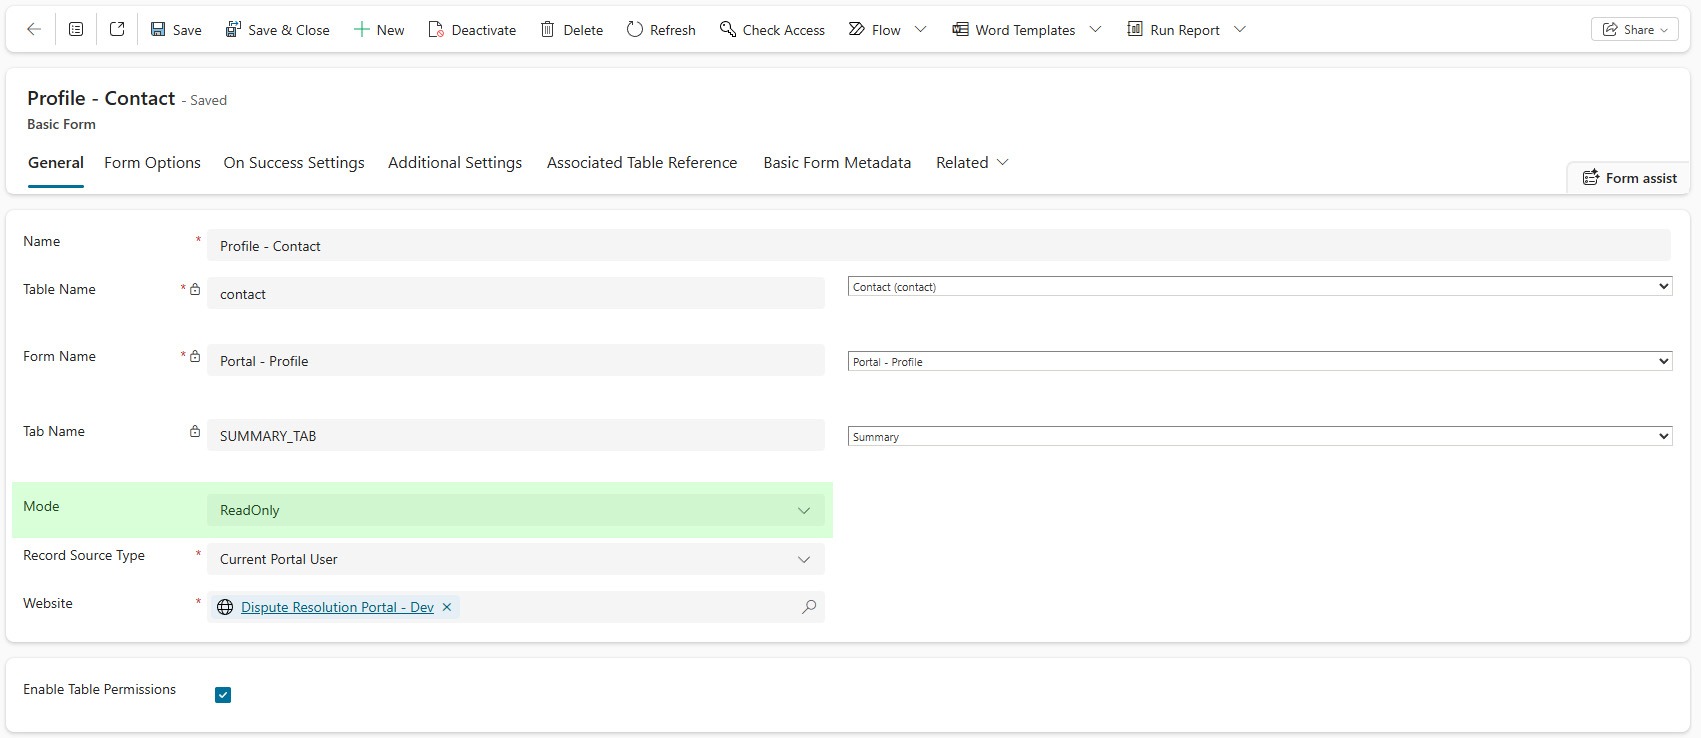
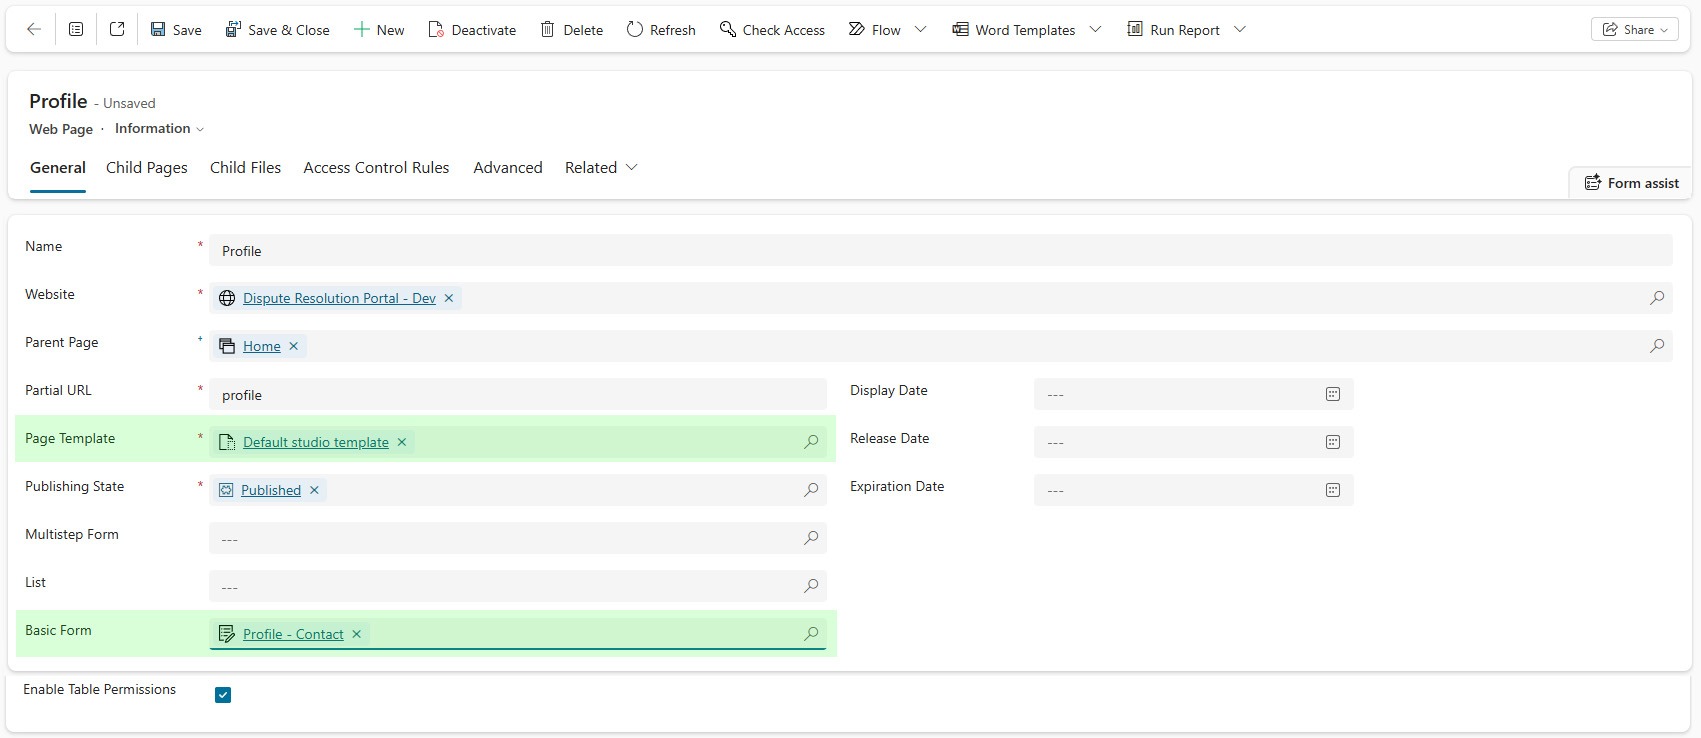
The first thing we’d do is create a Power Pages Form in read-only mode that displays the information that we want to show. We’ll then go to the Profile page, and change the Page Template to use the Default Studio Template, and then add our read-only form to this page. Now we have a read-only profile page instead of the previous editable version.
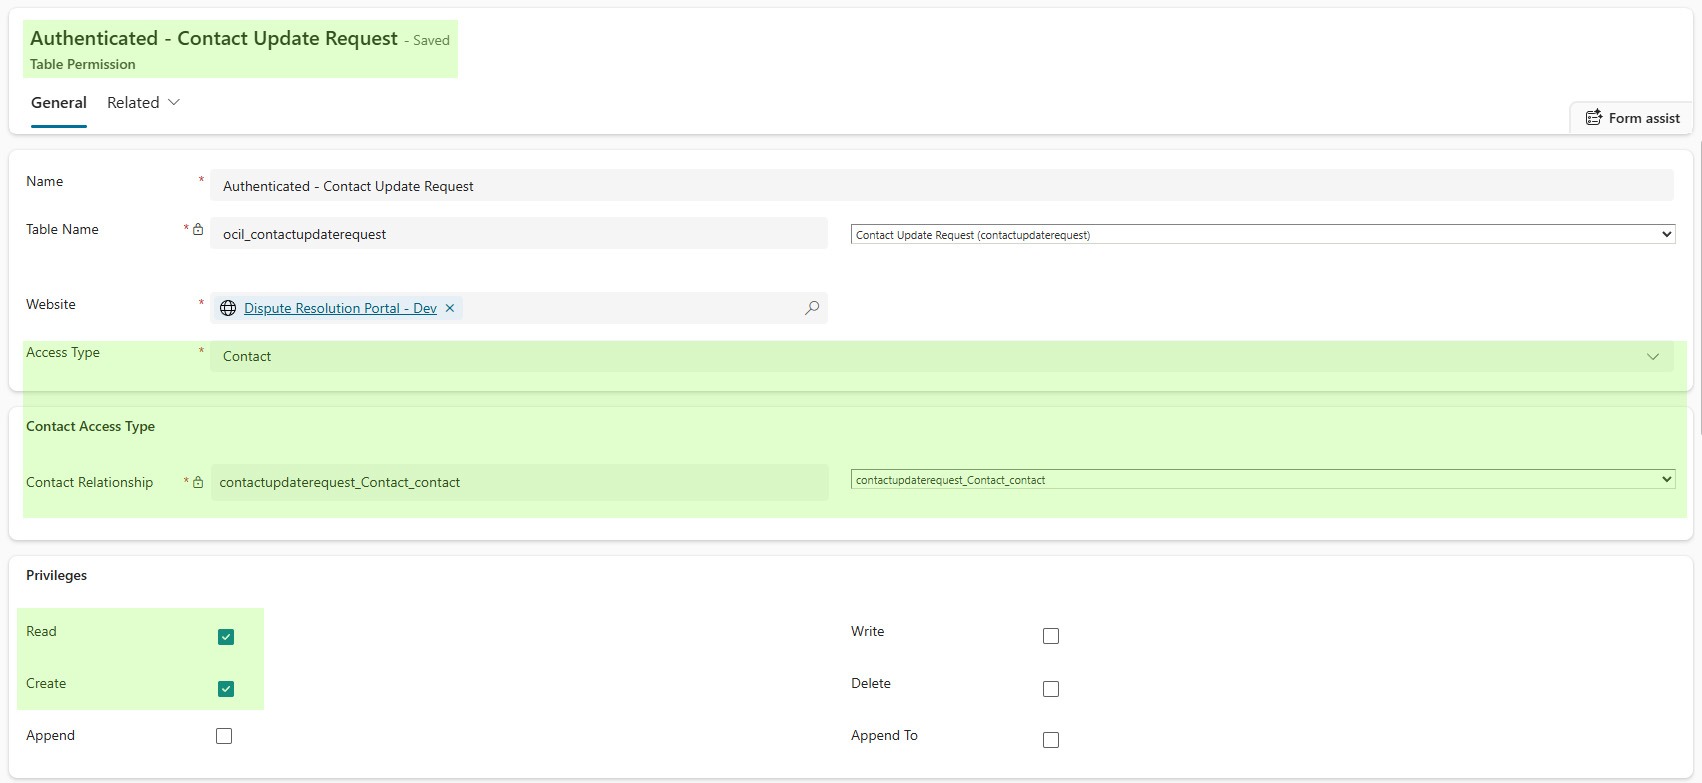
Next, create a new table in Dataverse called Contact Update Request, and add the columns that you want the users to be able to submit changes for, as well as a Lookup column to the Contact table. Add these columns to a Dataverse Form, and then use that to create a new Power Pages Form that inserts a row into Dataverse (and sets the Contact lookup to the current contact on save). Create a new Web Page, and add this form to the page. You’ll need to create Create and Read Table Permissions for this new table.

We’re going to write a small amount of JavaScript and Liquid that prefills the fields based on the existing values. You can also use metadata to accomplish this, but that is only true if this is for the Contact table, so we’ll use JavaScript and Liquid to keep this solution a little more generic. The code looks something like:
$(document).ready(function() {
	$('#new_firstname').val('{{user.firstname}}');
	$('#new_lastname').val('{{user.lastname}}');
});
Now, we’re going to create a link from our read-only profile form to the new Contact Update Request web page. Rather than hard-coding the URL of your Update Request Page, create a Site Marker and reference it via Liquid. Here is an example:
<a class="btn btn-primary" href="{{sitemarkers['Contact Update Request'].url}}">Update Your Profile</a>Model-Driven App
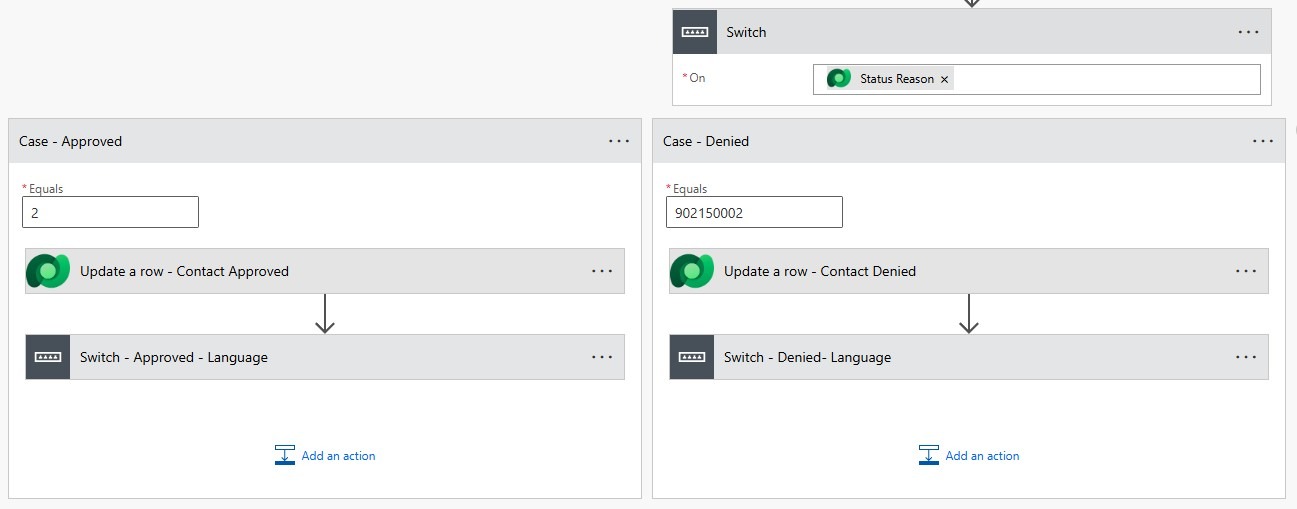
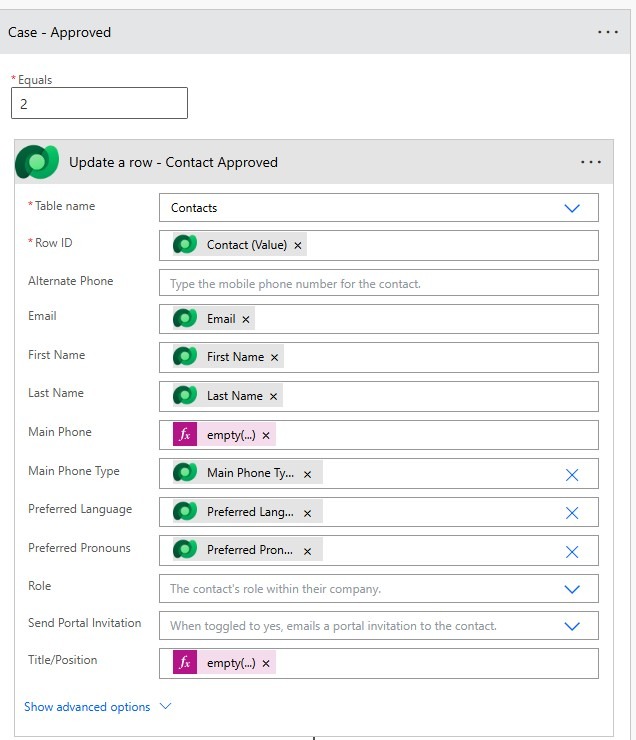
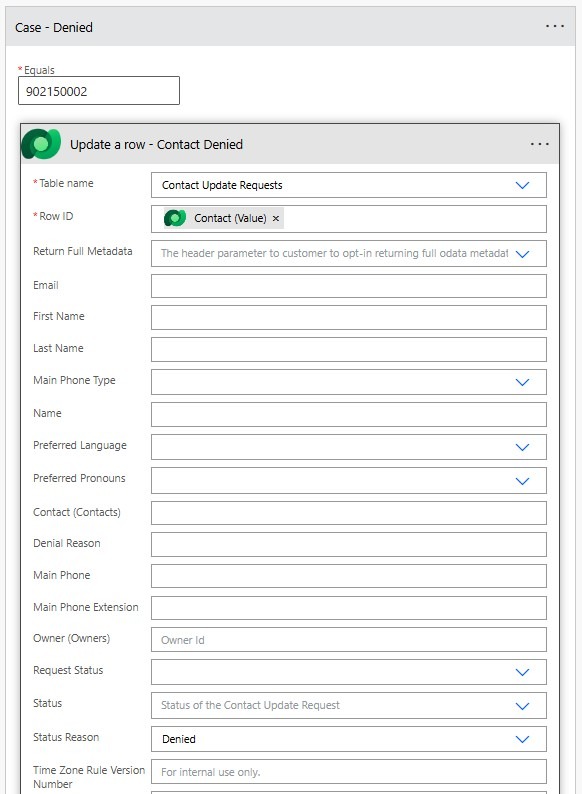
We’re also going to customize a model-driven app to allow someone to process the update requests. Add the Contact Update Request table to the sitemap, or add a view to a dashboard so that users can easily see a list of active rows. Create two new status reasons on the Contact Update Request – one for Approved and one for Denied. Allow the user to update the request to one of those two statuses, and to provide a reason for denial if necessary.
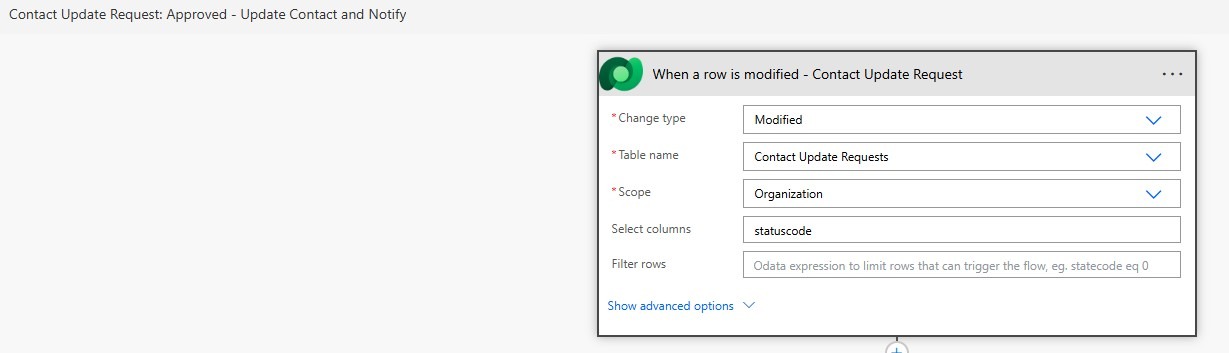
Create a Power Automate flow that is triggered when the status of the Contact Update Request is changed. If the status is Approved, copy the fields to the contact record. If the request is denied, sent an email notification to the user which includes the reason why.
With that in place, we now have a basic system that allows a user to request an update to the profile.
Improving the User Experience
If we wanted to take this solution a bit further, we can handle the situation where a user may attempt to submit a new update request before a previous one has been processed. In this case, let’s automatically deactivate unprocessed requests once a new one comes in, and let’s inform the user on their profile page if they have a request that has not been processed yet.
Let’s start with the warning to the user about the fact that they have a request already pending. We’ll use Liquid and FetchXML to query if there are unprocessed Contact Update Request rows. If yes, we’ll display a message beside the “Update Your Profile” button on the read-only profile page.
{% fetchxml pendingrequests %}
<fetch returntotalrecordcount='true'>
<entity name='new_contactupdaterequest'>
<attribute name='new_contactupdaterequestid' />
<filter type='and'>
<condition attribute='statuscode'
operator='eq'
value='0' />
</filter>
</entity>
</fetch>
{% endfetchxml %}
{% if pendingrequests.results.total_record_count > 0 %}
<div class="alert alert-warning">You have a pending change request. Submitting a new request will cancel the current pending request.</div>
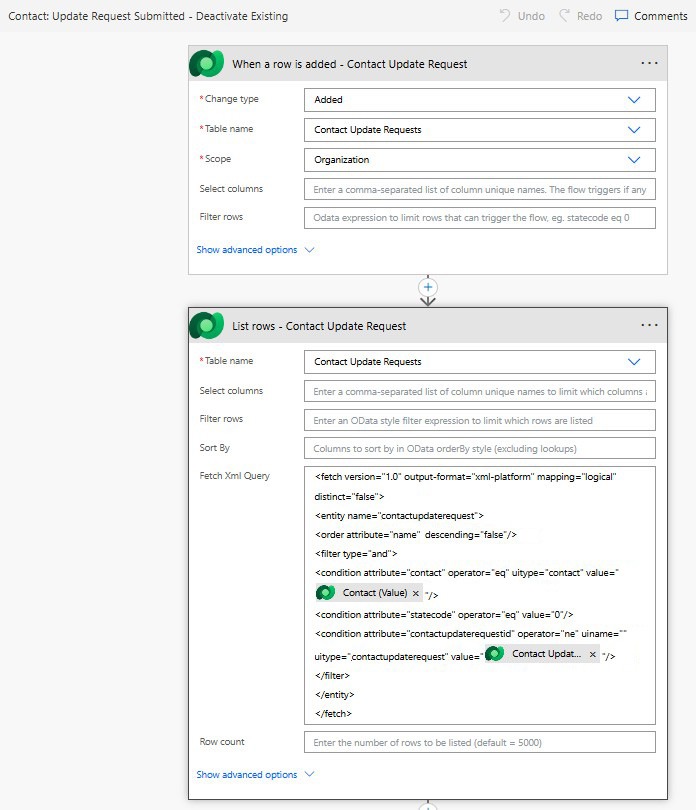
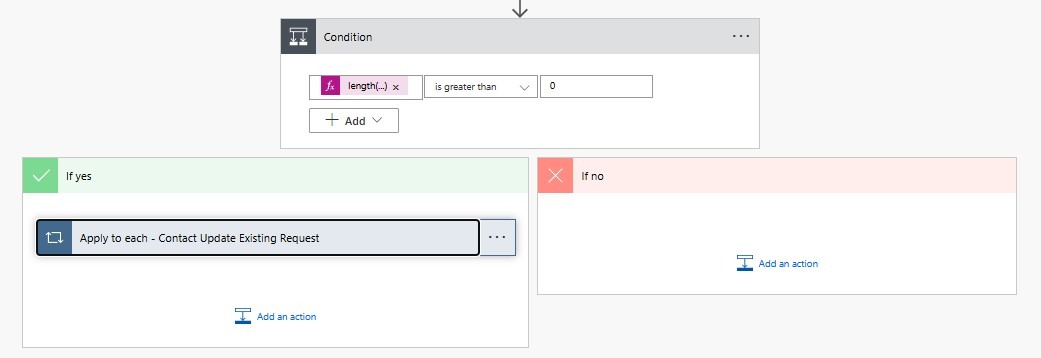
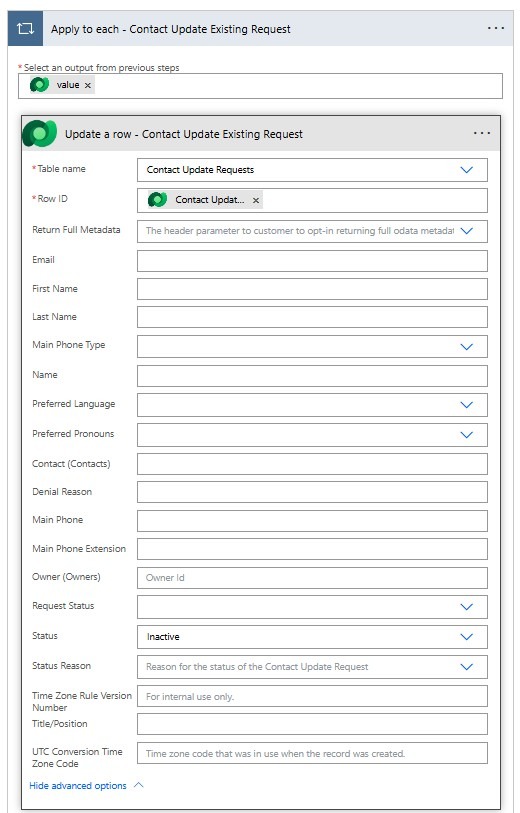
{% endif %}Next, we’ll create a Power Automate flow that triggers when a new Contact Update Request row is created. It checks if there are any old Contact Update Requests for that contact, and if so, deactivates them.
Our solution now allows users to view their profile, submit a request to update it, has features to handle multiple concurrent requests, and the elements necessary for back end users to process the requests. This technique works great for contacts, accounts, or any other table that contains information that should be reviewed before allowing a user to edit.

