
 Hourly Consulting
 Maintenance
 Training
 Implementation
 Microsoft Power Pages
 D365 & Power Platform
 Websites & Web Applications
 Blog
Blog
 Power Pages Tips
 Portals Community Call

Power Pages: Power Automate List Action Button
A member of the Power Pages community recently reached out to me asking about how you can know which contact triggered a classic workflow when added via the list action buttons. Unfortunately, the answer is: you can’t. You can, however, know which contact triggered a Power Automate flow. But as of now, you can’t add a Power Automate action button to a list via configuration – you need a bit of JavaScript to create the action button and invoke a Power Automate flow via the Power Pages Web API. In this post, I’ll look at how to do exactly that.
Adding the Action Button
First, we’re going to borrow some code from one of my previous blog posts. A year ago, I did a post about creating a custom list action button that opened a modal displaying a form for a row related to the main row in the list. We’re going to borrow the JavaScript required to create the button:
$(document).ready(function () {
    $(".entitylist.entity-grid").on("loaded", function () {
        $(this).children(".view-grid").find("tbody tr").each(function (i, e){
            var tr = $(this);
            var rowId = tr.data('id');
            $("<li role=\"none\"><a role=\"menuitem\" tabindex=\"-1\" href=\"#\" title=\"Run Flow\" aria-setsize=\"2\" aria-posinset=\"1\"><span class=\"fa fa-edit fa-fw\" aria-hidden=\"true\"><\/span> Run Flow<\/a><\/li>").appendTo($(this).find('.dropdown-menu')).find('a').on('click', function () {
                // add code to invoke the flow here
            });
        });
    });
});
All I’ve changed in that code is the text of the new button. That gets us this:

Create the Power Automate Flow
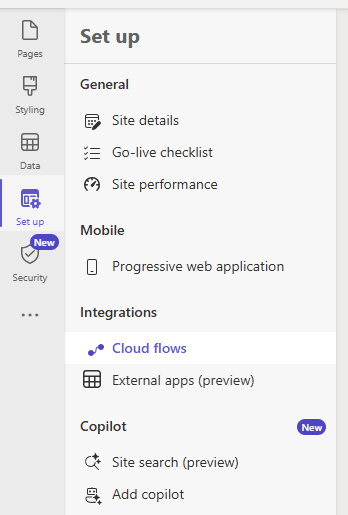
Next, let’s create the Power Automate flow that we are going to call. In the Power Pages Design Studio, go to the Cloud flows area in the Set up Workspace.
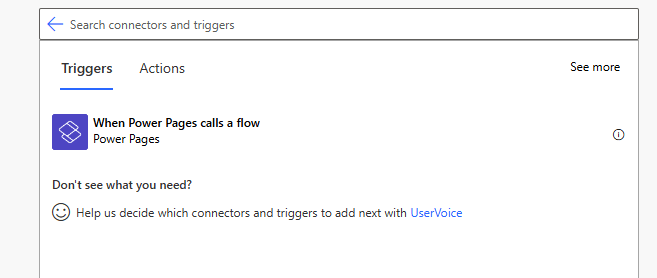
Here we can create the new flow. We’ll use the “When Power Pages calls a flow” trigger, which will allow us to call the flow via the Power Pages Web API.
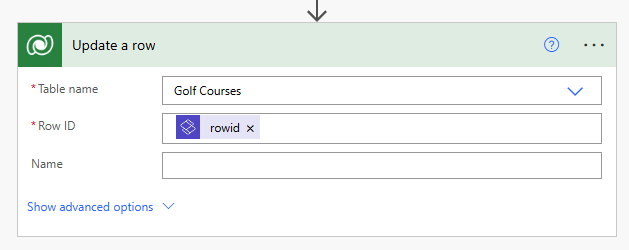
Once you’ve got your trigger selected, we’re going to add a text input, which will allow us to pass in the ID of the row that the user wants to invoke the flow on. I’ve called it “rowid”.

In the flow I’m using to test this, I’m going to set a lookup to be the value of the currently logged in contact. So I’ll use the “Update a row” action in the Dataverse connector, using my “rowid” input.
The “When Power Pages calls a flow” trigger provides a few default parameters in the body, including the ID and URL of the Power Pages site, and the ID of the contact who initiated the request. We’ll use that to set a lookup in our flow:

Trigger the Flow in Our JavaScript
With our flow now complete, all we have to do is trigger it in our JavaScript, passing in our custom “rowid” parameter:
We get the URL to invoke our flow in the Power Pages Design Studio, and using the rowId variable we defined in our code above, the code to invoke our flow looks like:
webapi.safeAjax({
    type: "POST",
    url: '/_api/cloudflow/v1.0/trigger/3b113f53-5ac2-ef11-a72e-0022483dac7c',
    data: {
        'eventData': JSON.stringify({ 'rowid': rowId })
    },
    success: function (res, status, xhr) {
    }
});
Putting it all together, we get the code necessary to trigger a Power Automate flow via a custom action button on a list:
$(document).ready(function () {
    $(".entitylist.entity-grid").on("loaded", function () {
        $(this).children(".view-grid").find("tbody tr").each(function (i, e){
            var tr = $(this);
            var rowId = tr.data('id');
            $("<li role=\"none\"><a role=\"menuitem\" tabindex=\"-1\" href=\"#\" title=\"Run Flow\" aria-setsize=\"2\" aria-posinset=\"1\"><span class=\"fa fa-edit fa-fw\" aria-hidden=\"true\"><\/span> Run Flow<\/a><\/li>").appendTo($(this).find('.dropdown-menu')).find('a').on('click', function () {
                webapi.safeAjax({
                    type: "POST",
                    url: '/_api/cloudflow/v1.0/trigger/3b113f53-5ac2-ef11-a72e-0022483dac7c',
                    data: {
                        'eventData': JSON.stringify({ 'rowid': rowId })
                    },
                    success: function (res, status, xhr) {
                    }
                });
            });
        });
    });
});
Keep in mind that any changes made in Dataverse via a Power Automate flow may not show up right away due to caching.


Hi Nicholas. Great blog, thank you for sharing.
You have already mentioned that record that gets created using power automate or changes made to any records through power automate may not show up due to caching, but is there any way to bring/push those changes?
In my use case, I needed to clone the record and I have added the list button on the list and power automate clones the record but record doesn’t show up straight away unless I do sync and preview!
Hi Akshay!
Unfortunately there is no official way to force the cache to be refreshed.
The cache shouldn’t last too long – usually no more than a minute or two.
We usually find that providing the user some messaging (like telling them it may take a minute or two for the clones to appear) is usually good enough.
Alternatively, have you considered using the Web API instead of Power Automate? The Web API doesn’t suffer from the same caching challenges.
Nick