
 Hourly Consulting
 Maintenance
 Training
 Implementation
 Microsoft Power Pages
 D365 & Power Platform
 Websites & Web Applications
 Blog
Blog
 Power Pages Tips
 Portals Community Call
Capturing Dynamics 365 Portals Interactions in Customer Insights In an Hour or Less – Part 2 – Data Model, Data Source, and Basic Setup
In this post, I provide a brief introduction of the Dynamics 365 for Customer Insights service for those who aren’t already familiar.
Dynamics 365 for Customer Insights (DCI) is an Azure-based service that allows you to report on how customers are interacting with your company. Customers don’t interact directly with DCI; instead they interact with other systems and those interactions are consolidated and available for reporting in DCI.
Where Can Dynamics 365 for Customer Insights Pull Data From?
Since customers don’t interact with DCI directly, we need to pull the data from somewhere. As the name implies, this is where Data Sources come in. There are currently four data sources supported:
- Dynamics 365
- Azure Storage
- Exchange Online
- Microsoft Social Engagement
In this post, we’ll focus on using Dynamics 365 as our data source.
When you go to add a Dynamics 365 data source into DCI, you’ll first be asked for your Dynamics 365 login credentials, which must have administrative rights to your Dynamics 365 instance. Next, you have the option to select which entities you want to synchronize with DCI. When you select an entity, you also get to choose whether the entity will be synchronized as a profile or as an interaction.
The Customer Insights Data Model: Profiles, Interactions and Links
There are three main concepts when it comes to how DCI architects the data: profiles, interactions, and links. (There are also KPIs, but we’re not getting into those here.)
I find the easiest way to think about these concepts is to think about one of the most common types of reports in DCI: the timeline. This is a basic visualization that tells you, for a given record, what has happened over the course of a specific period of time. So, for example, you could look at what interactions a particular contact has had, plotted against time. In this case, the contact is your profile. Reports in DCI are created for a specific profile type, and run on one instance of a profile. So, in this case, Contact is one of the profile types, and when we run our report, we select one specific contact to run the report on. The interactions give us the data points we want to see. Commonly used activity records like phone calls or emails are setup as interactions.
So, when setting up a Dynamics 365 data source, you need to determine which entities you want to include and, if included, whether they are profiles or interactions. Choose profiles if you want to be able to be able to create a report for that entity that shows all of the interactions related to it. Otherwise, choose interaction if that record is something that will give you insight into one of your profile records.
Finally, links determine which interactions apply to which profiles. In database terms, think of profiles as one table, and think of interactions as another table. Without additional setup, these tables are not related; links need to be created to accomplish this. A great example of a link would be joining the Regarding field on an Email record (the interaction) with the Contact ID field on the Contact record (the profile).
In our case, we are interested in seeing what a contact did on the portal right before a case is created. So our profile entity will be Contact. In this situation, we won’t use any of the out-of-the-box interactions, since the Portals interactions are setup a little bit differently.
Detailed Steps to Setup Dynamics 365 for Customer Insights
We followed these steps to setup Customer Insights:
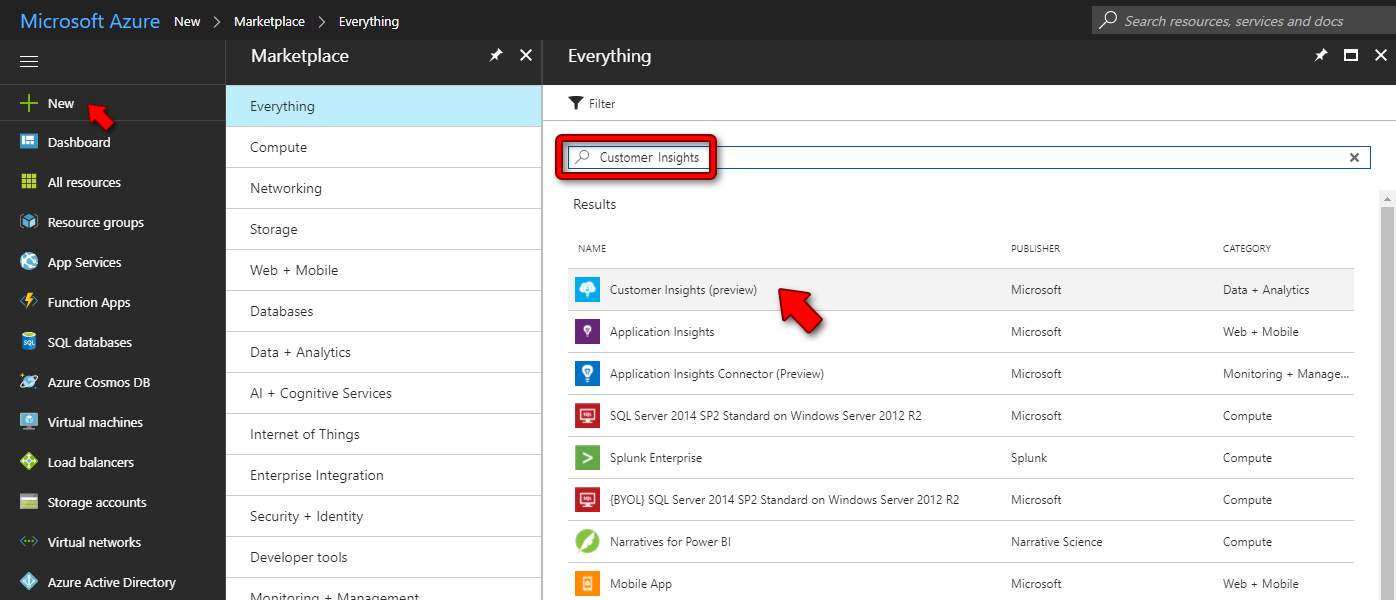
- Login to the Microsoft Azure Portal (https://portal.azure.com/).
Important – Make sure your Azure subscription uses the same account as your Dynamics 365 subscription. We ran into errors when trying to use an Azure subscription that was not tied to our O365 environment.
- Click New to add a resource
- Search for Customer Insights and select Customer Insights (preview)
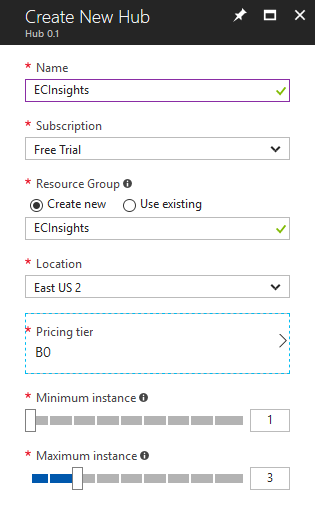
- Click Create to create the DCI instance. At this point, if you don’t already have an Azure subscription, you’ll need to sign up for one.
- Fill out the Create New Hub screen, including selecting a name, subscription, resource group, location, and pricing tier (Basic is fine for what we’re doing here), as well as the minimum and maximum instances (which I left as the default), and click Create.
- Once the DCI resource has been deployed, open it, which should bring you to the Overview screen.
- Click on Data Sources, then Add.
- Provide a name for the data source, select Dynamics CRM Online as the Data Source Type, and click Login to CRM.
- Enter your credentials (the user should be a system administrator), and Accept the permissions request.
- Select your organization from the dropdown.
- Click Configure required settings to select which entities to synchronize with Customer Insights. For our purposes, we’re only interested in having the Contact entity, with Profile set to Yes.

- Click Ok, and then Create
- Once created, click the Play triangle to activate the Data Source in the list of all data sources.

In my next post, I’ll cover turning on the integration between Dynamics 365 Portals and DCI.


Hola que tal, a que se refiere con dejar en SI el boton de “is profile”, saludos.
Hi David,
If Google translate did it’s job correctly, it sounds like you’re asking “what is meant by the ‘is profile’ being set to ‘yes'”.
In the step where I reference “Is Profile”, I’m talking about enabling the entities that will be synchronized from Dynamics to Customer Insights. Customer Insights is all about tracking interactions with customers, so the “Is Profile” attribute is meant to capture if an entity represents a customer (which is also called a profile) or an interaction. In our case, the contact entity is our customer, and we want to track the interactions against it, so we set it up as a “Is Profile” = Yes entity. Otherwise, Customer Insights treats the entity as a type of interaction that can be associated with a profile.
Hope that helps.
Nick