
 Hourly Consulting
 Maintenance
 Training
 Implementation
 Microsoft Power Pages
 D365 & Power Platform
 Websites & Web Applications
 Blog
Blog
 Power Pages Tips
 Portals Community Call

Power Apps Portals: Adding Custom Styles to Legacy Front-Side Editor
While Microsoft continues to invest heavily in the Portals Studio, which provides a new What You See Is What You Get (WYSIWYG) editing experience for Power Apps Portals, there are still many good reasons to use the Legacy Front-side Editor. In this post I’ll describe how you can add additional styling options to the rich text editors to allow content authors to create consistent pages.
Legacy Front-side Editor
The Legacy Front-side Editor is the experience you get when you log into your Power Apps Portals with a user that has Grant Change permission. The out-of-the-box Administrators web role has these permissions. When you have these permissions you’ll notice right away that edit buttons start popping up when you hover over certain aspects of the page.

While Microsoft is not really investing in this experience, people still find it useful in some situations. For example, if you want to give someone the ability to easily change content on the portal without them needing to get into make.powerapps.com, the Legacy Front-side Editor is a great fit. It also is nice for editing things like page-specific JavaScript or CSS.
Throughout the front-side editing experience you’ll see WYSIWYG rich text editors – Power Apps Portals uses the open-source CKEditor plugin. Within the editor there are some options to apply styles to your content:
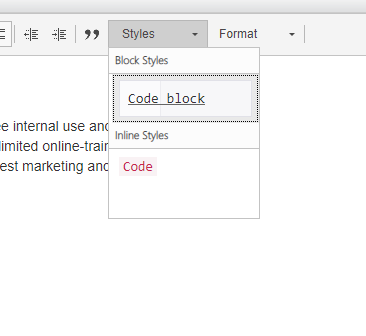
Out of the box, the options are limited to Code Block and Code, but by using some JavaScript you are able to add more options. This is done by tapping into the CKEditor API.
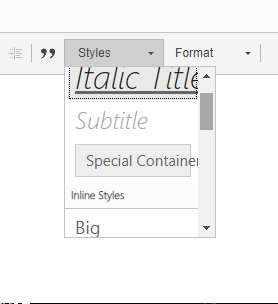
Below is an example of JavaScript that adds styling for italic titles, subtitle, deleted text, and a whole lot more:
if (typeof(XRM) != "undefined" && XRM.ckeditorSettings && XRM.ckeditorCompactSettings) {

  XRM.ckeditorSettings.stylesSet = XRM.ckeditorCompactSettings.stylesSet = "editorStyleSet";

  (function(t) {
      var e = function() {
          function t() {}
          t.prototype.createStyleSet = function() {
              return [{
                  name: "Italic Title",
                  element: "h2",
                  styles: {
                      "font-style": "italic"
                  }
              }, {
                  name: "Subtitle",
                  element: "h3",
                  styles: {
                      color: "#aaa",
                      "font-style": "italic"
                  }
              }, {
                  name: "Special Container",
                  element: "div",
                  styles: {
                      padding: "5px 10px",
                      background: "#eee",
                      border: "1px solid #ccc"
                  }
              }, {
                  name: "Big",
                  element: "big"
              }, {
                  name: "Small",
                  element: "small"
              }, {
                  name: "Typewriter",
                  element: "tt"
              }, {
                  name: "Computer Code",
                  element: "code"
              }, {
                  name: "Keyboard Phrase",
                  element: "kbd"
              }, {
                  name: "Sample Text",
                  element: "samp"
              }, {
                  name: "Variable",
                  element: "var"
              }, {
                  name: "Deleted Text",
                  element: "del"
              }, {
                  name: "Inserted Text",
                  element: "ins"
              }, {
                  name: "Cited Work",
                  element: "cite"
              }, {
                  name: "Inline Quotation",
                  element: "q"
              }, {
                  name: "Language: RTL",
                  element: "span",
                  attributes: {
                      dir: "rtl"
                  }
              }, {
                  name: "Language: LTR",
                  element: "span",
                  attributes: {
                      dir: "ltr"
                  }
              }, {
                  name: "Compact table",
                  element: "table",
                  attributes: {
                      cellpadding: "5",
                      cellspacing: "0",
                      border: "1",
                      bordercolor: "#ccc"
                  },
                  styles: {
                      "border-collapse": "collapse"
                  }
              }, {
                  name: "Borderless Table",
                  element: "table",
                  styles: {
                      "border-style": "hidden",
                      "background-color": "#E6E6FA"
                  }
              }, {
                  name: "Square Bulleted List",
                  element: "ul",
                  styles: {
                      "list-style-type": "square"
                  }
              }]
          }
          ;
          return t
      }();
      t.CkEditorContentStyleSetFactory = e
  }
  )(Editor || (Editor = {}));
}
Once you add that JavaScript, you’ll see all the options that appear in the Styles dropdown in the rich text editors.
You can customize the above JavaScript to meet your needs – this can be useful if you need to enforce consistency across your portal without have to expect all content authors to know details like font color, size, etc.
There are a few different ways to add that JavaScript to your portal. Typically you want that JavaScript to appear on all pages, so you can include it inline in the Header or Footer web templates. Or you can add the JavaScript as a Web File (if you want to upload it as a file with a .js extension you may need to temporarily unblock .js files from being uploaded as attachments to Dataverse), and then use the Head/Bottom Content Snippet to add the script reference to the Web File.


[…] post Power Apps Portals: Adding Custom Styles to Legacy Front-Side Editor appeared first on Engineered […]
Hey Nick,
Slightly unrelated – but is it possible to extend the frontside editor to allow for adding additional fields (custom or otherwise) – I have a bunch of custom web page fields that I would love to be able to expose via the frontside editor?
Any ideas/help/advice would be greatly appreciated!
Many thanks
Hey Lee,
You can try using the editable Liquid tag for fields on Web Pages, Content Snippets and Web Links: https://docs.microsoft.com/en-us/powerapps/maker/portals/liquid/portals-entity-tags#editable
You can to include it on the page somewhere (it doesn’t expose the fields in the front-side editor popups), but you can always to Liquid to only show the editable version of those fields to users with an appropriate web role.
Nick