
 Hourly Consulting
 Maintenance
 Training
 Implementation
 Microsoft Power Pages
 D365 & Power Platform
 Websites & Web Applications
 Blog
Blog
 Power Pages Tips
 Portals Community Call

Power Pages: Pro Code Techniques in the Templates – Custom Interface for Service Selection
This month we continue our look at some of the pro code techniques that appear in the templates available for Power Pages. This time we’re going to look at the “Schedule and Manage Meetings” template, which provides a multistep form for booking a meeting. This form has lots of pro code goodies in it, so this won’t be the only post, but for now, we’re going to look at the first step in the form where the user chooses what type of meeting they want to have.
Selecting a Service
When you click the Book Now link on the homepage of the “Schedule and Manage Meetings” template, you’ll be presented with an interface that looks something like:
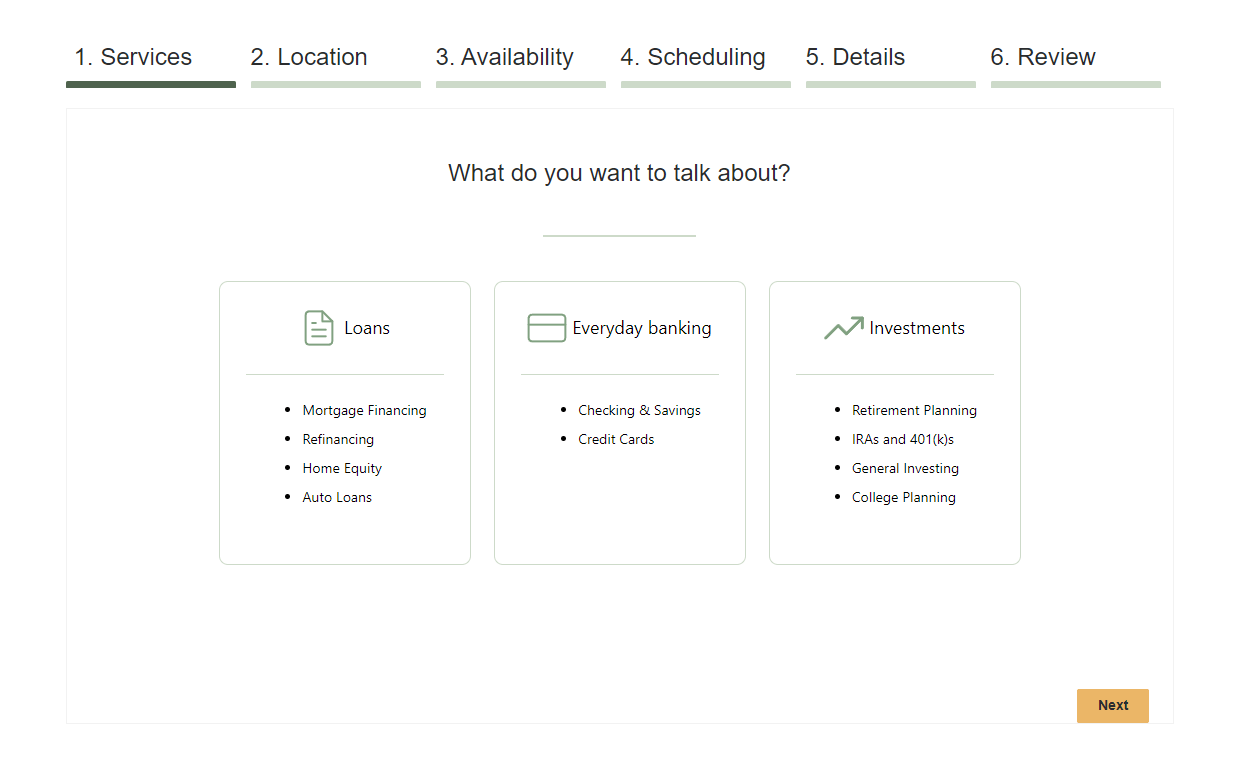
If you look at the underlying Dataverse form that drive this step, you’ll see that all it really contains is the title (What do you want to talk about?) and a lookup to the service.

A lookup on a Power Pages form will mirror the functionality that you see on the model-driven app: if a value is selected, you’ll see the name of the selected row, plus a magnifying glass allowing you to select a row. But on the Power Pages form, we don’t see that. Instead, we see cards that allow us to choose the service. What’s going on?
Hiding the Default Experience
All of the magic we see here is happening in the Custom JavaScript of the first step (1. Services) of the multistep form. You can use the XrmToolBox Portal Code Editor (which now supports the Enhanced Data Model!), or use the VS Code for Web Integration to quickly view this code. Or you can use the Portal/Pages Management model-driven apps, or download the code using the pac powerpages download command.
In this JavaScript, right on line 2 you’ll see code to hide the lookup. This uses jQuery to look for an element with a data-name attribute of lookup-service-section, and then hides that area. This is possible because the person who designed the model-driven app form specifically gave that section a name, which you can reference in your JavaScript.

With that section hidden, now the fun begins to put in a custom interface to choose the service.
Add Cards for Services
The first step is to get the available services. They aren’t hardcoded; instead, they come from a table in Dataverse (msdyn_servicecategory). A basic Web API call is made (see the loadRecords(), appAjax() and webapi.safeAjax() functions) to get the full list of services. Remember that the Web API enforces table permissions, so there is a global permission for the msdyn_servicecategory table.
Once the list of services is retrieved, you’ve got the initializeCards() function that loops through them all and creates the HTML markup for the cards. Each card is actually a radio input that is hidden, which the visible part being its label.
To make the code a bit more complicated, services are group into categories (like Loans, Investments and Everyday Banking). So what you see to begin with is actually the list of categories. Clicking on one of these will give you the services for that category. This is handled via click and keydown events on each of the category radio buttons. The code to display the services is similar to that of categories, including using radio buttons, and handling the click and keydown events.
Once a user does select a service, JavaScript is used to set the lookup field (msdyn_services), which was hidden at the beginning. If you haven’t worked with lookups before in JavaScript on Power Pages, it is important to know there are three fields you need to set:
- #[logical name]: this should be the ID (GUID) of the select row (in this case the Service)
- #[logical name]_name: this should be the name of the row (in this case the Service)
- #[logical name]_entityname: this should be the name of the related table (in this case msdyn_service)

Once the service is chosen, JavaScript is used to submit the form, so that it proceeds to the next step:

What I Like About This Approach
Overall I think this is a very solid technique to build a custom interface for choosing a service. The out-of-the-box lookup experience wouldn’t have been as nice since the idea of category and service wouldn’t have been so clear. Plus this interface allow you to provide more details about the choices, instead of just the name, and is visually nicer with things like icons.
This approach seemed to be a bit more polished than some of the other ones I’ve looked at in the templates. Having the loading screen show up while the call to the Web API gets the lists of services was a nice touch, as was the support for keyboard input.
How Else Could It Be Done?
There is one alternative approach that I could recommend. I wouldn’t say it is better, just different.
Rather than using the Web API to get the list of services, the FetchXML Liquid tag could have been used instead. Using the FetchXML Liquid tag, you could construct a JSON object that contains all the details you need about the services and then use that object instead of the data retrieved from the Web API. This would have eliminated the need for the loading experience, as the services would have been available immediately as part of the page load, and eliminated the need for the Web API entirely for this step.
One other small thing – they could have used Form Metadata to convert the lookup to a select (dropdown). That way it would have been just a single line of JavaScript to set the field, instead of three.


It is a very interesting template.
I hope you’re going to review the Scheduling component, which is implemented as a Web Resource.
It also has an excellent user interface and uses the “fake Web API” approach to retrieve the initial dataset (which you covered in the September community call).
I definitely will be!
Nick