
 Hourly Consulting
 Maintenance
 Training
 Implementation
 Microsoft Power Pages
 D365 & Power Platform
 Websites & Web Applications
 Blog
Blog
 Power Pages Tips
 Portals Community Call

Capturing Dynamics 365 Portals Interactions in Customer Insights In an Hour or Less – Part 4 – Visualizing Insights Data
In the final post of my series on integrating Dynamics 365 Portals with Dynamics 365 for Customer Insights, I’ll go through the steps necessary to surface the DCI timeline visualization on the Case form in Dynamics 365.
Visualizing Your Interactions in Dynamics 365 for Customer Insights
You can create rich visuals to present your DCI data; this is done via the Customer Insights application, a link to which can be found on your Customer Insights Overview in the Azure Portal.
In our case, we are wanting to create a timeline view of all of the interactions for a particular contact. To do this, we first create a Profile Instance View for Contacts. We can then create a Timeline Widget, and add the interactions we want.
- Login to the Microsoft Azure Portal (https://portal.azure.com/).
- Open your DCI resource, click on the Application link on the Overview screen. You will be taken to the Customer Insights application.

- Ensure you are in the Profile Instance Views area; if not, navigate to it using the hamburger/tribar icon.

- Click + Add View.
- Enter Contact as the Name, Display Name, and Profile Type.
- For the Criteria, select crmrecordid equals the GUID of the contact you are using for testing purposes. This should be the contact that you are using on your portal to perform the interactions like searches or viewing knowledge articles. Clicking Find should located the record.

- Click Create View.
- Click + Add Widget, and select Timeline from the list of available widgets, and click Next >.
- For Sources, choose Interactions, and select a Title.
- Select the interaction types you wish to display on your timeline; in my case I’m choosing Portal Search and Knowledge Article. For each interaction, select which fields you want displayed on the timeline. For Portal Search, I’ve chosen the portal_searchstring and Timestamp, and for Knowledge article I’ve chosen portal_knowledgetitle and Timestamp.
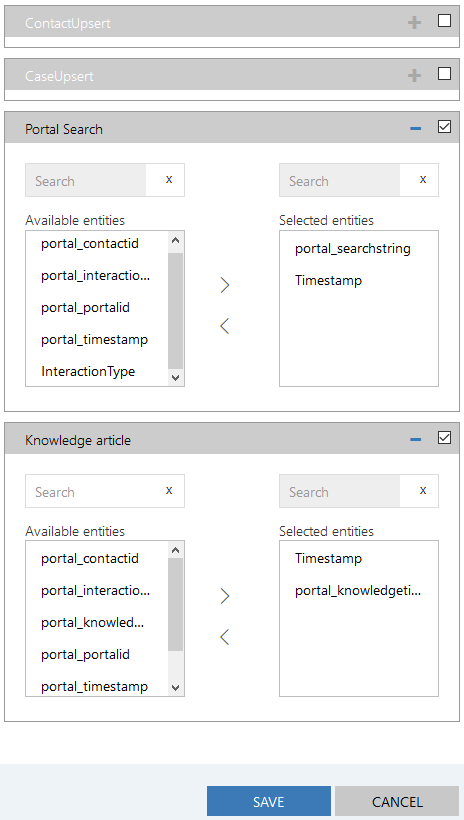
- Click Save.
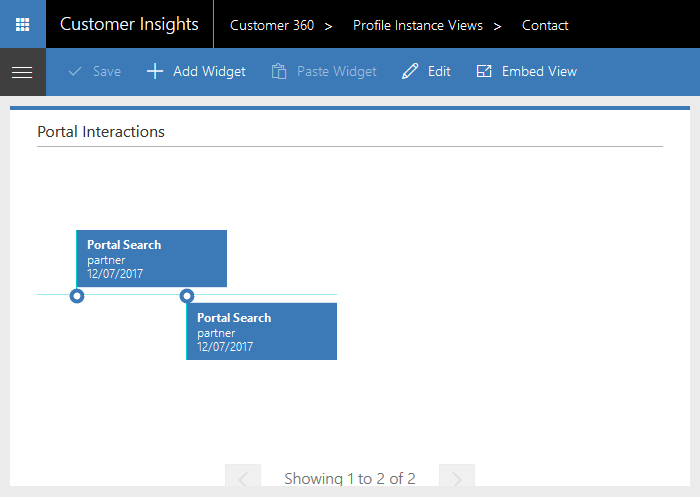
At this point, if everything is configured properly, and you’ve actually done some of the interactions on your portal (ie. performed a search, view a knowledge article), then you should see a timeline of those interactions.
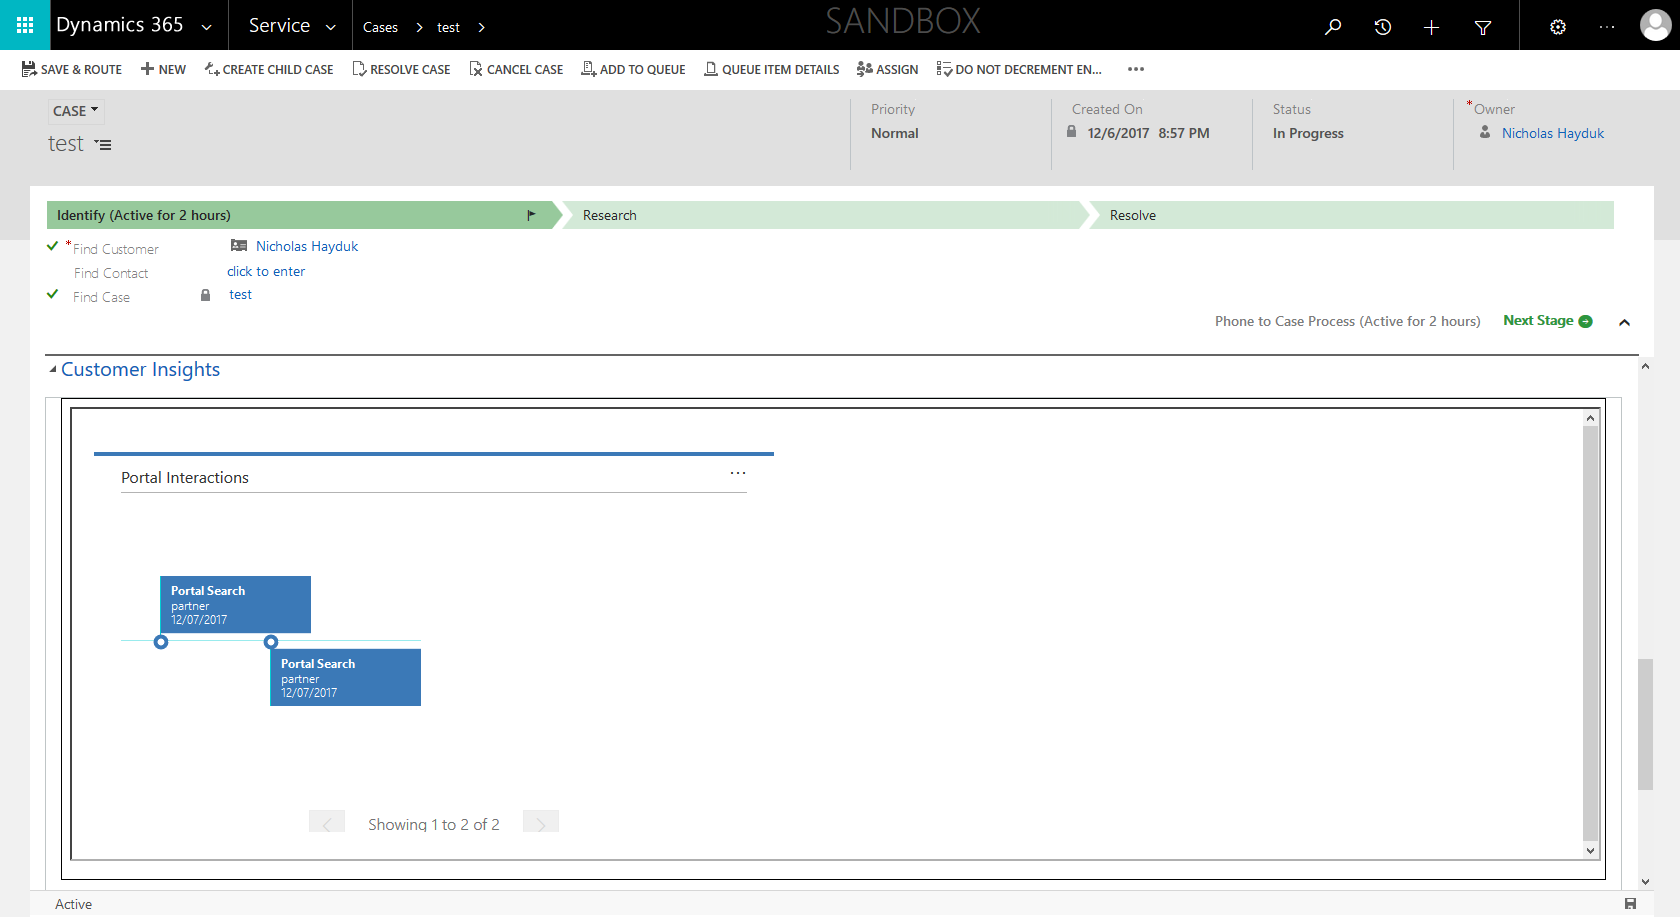
The next step is embedding the timeline on the Case form in Dynamics 365.
Embedding the Timeline on a Dynamics 365 Form
Embedding the timeline is pretty straight-forward; Microsoft provides documentation here on how to do it. All you really need to do is create a web resource and include it on the form of the entity.
However, our situation is just slightly different. In the Microsoft example, they wanted to show the Contact timeline on the Contact form. In our situation, we want to show the Contact timeline on the Case form (based on the customer attached to the case).
So I made a few tweaks for our situation:
-
I added the following code to get the ID of the customer related to the case (instead of the ID of the record whose form we’re on):
if(window.parent.Xrm.Page.data.entity.getEntityName() == 'incident') {
	var attr = 'customerid';
	if (window.parent.Xrm.Page.getAttribute(attr).getValue() && window.parent.Xrm.Page.getAttribute(attr).getValue()[0] && window.parent.Xrm.Page.getAttribute(attr).getValue()[0].id) {
		crmEntityName = 'crmrecordid';
	   	crmEntityId = window.parent.Xrm.Page.getAttribute(attr).getValue()[0].id;
	}
}
This code was added right after the following line:var crmEntityId = window.parent.Xrm.Page.data.entity.getId();
-
I added some sizing to the IFrame so it fit the Timeline properly:
<iframe id="frameDCIView" src='' width="100%" height="450px"></iframe>
-
I also changed the format of the URL, since what they provided didn’t seem to work for me:
var dciViewUrl = "https://
.apps.azurecustomerinsights.com/c360/#/view?viewid= ";
You can download the full source code for my web resource here.
After embedding the web resource on the Case form, we get the following results:
Wrap-up
In this series, we went through the process of setting up a DCI resource in Azure, integrating it with Dynamics 365 Portals, and displaying a timeline of interactions on a Dynamics 365 form. Now, when users interact with our portal in certain ways (searching, viewing knowledge articles, viewing a blog post, or a forum thread), these events will be record in DCI and can be surfaced in Dynamics 365. This provides support staff with valuable information to assist them in resolving cases as quickly and efficiently as possible.


Excellent blog on dynamics customer Insights, Please keep sharing.