
 Hourly Consulting
 Maintenance
 Training
 Implementation
 Microsoft Power Pages
 D365 & Power Platform
 Websites & Web Applications
 Blog
Blog
 Power Pages Tips
 Portals Community Call
Power Apps Portals: Notes vs Timeline Metadata – Timeline Metadata Deep Dive
In this series of blog posts, I’m looking at the ways to enable an asynchronous conversation between Dynamics/Power Apps users and portals users. The two most common techniques I see use Entity/Web Form Metadata – either the Notes or Timeline metadata option. This post covers the newer way – using the Timeline metadata option.
Timeline Metadata Overview
Enabling Timeline Metadata causes the Portal to display activities related to the record on the Portal. The Portal also comes with a custom activity type, called Portal Comment, can be created by both Portals users and Dynamics 365/Power Apps users.
Steps to Configure
Unfortunately, Microsoft doesn’t have step-by-step instructions for using the Timeline metadata option.
So here is what I’ve put together:
- Ensure that Activities has been enabled for the entity.
- Add the Timeline control to your model-driven app form. Note that currently this requires going to the Classic solution editor, as the new “maker” experience does not allow you to add/edit the Timeline control.
- Ensure that the “Activities” tab is selected at the Default tab on the Web Client Properties -> Display tab of your Timeline control properties. See the Issues with Default tab Setting section below if you see Activities as the default, but the Timeline still isn’t showing up on the Portal.

- On your Entity/Web Form, add a new Metadata record with a type of Timeline:
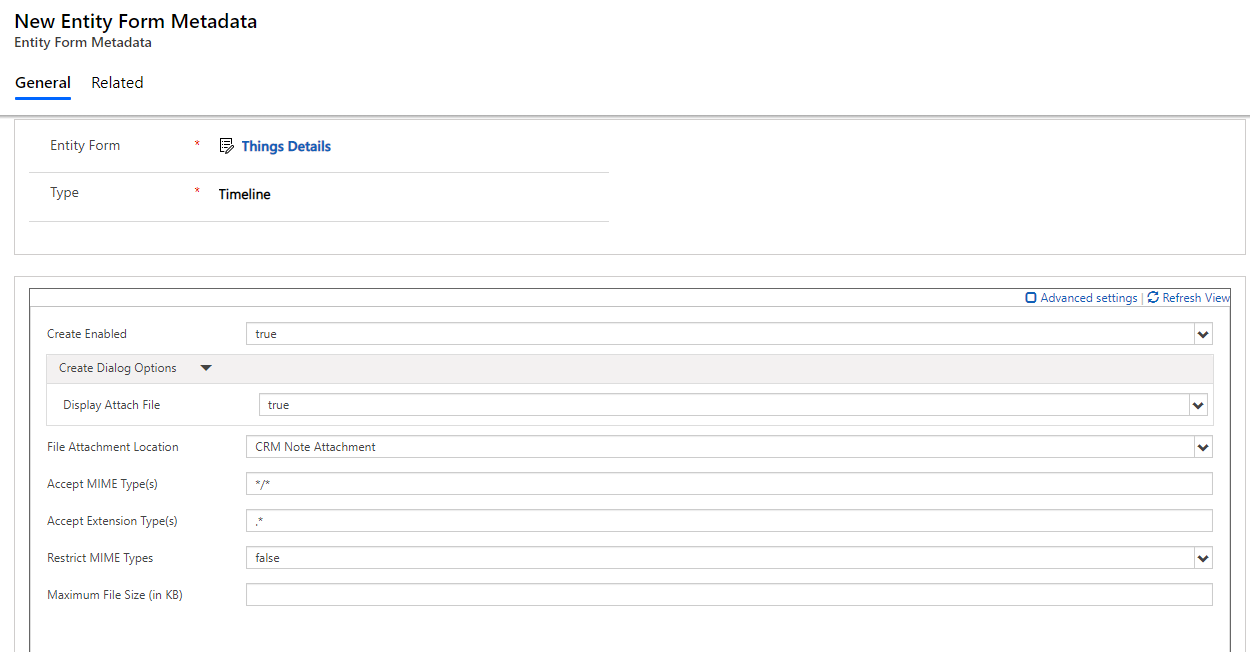
- Set your desired settings for whether users can create Portal Comments, as well as attach files. The Advanced settings allow you to control various aspects of the user interface.
- Configure Entity Permissions.
- For read-only for any activity type (including Portal Comments), create an Entity Permission for Activity (activitypointer) with Parent scope pointing at the Entity Permission of the primary record.
- If you want users to create Portal Comments on the Portal, create an Entity Permission for Portal Comments (adx_portalcomment) with Read, Create, and Append privileges with Parent scope pointing at the Entity Permission of the primary record. Make sure that users have the Append To privilege on the primary entity.
- You can configure which activity types are displayed in your Timeline by modifying the filter criteria on the Portal Timeline View that exists for the Activity record type. You can include custom activity types if you want. By default, you’ll see Phone Calls, Appointments and Emails, in addition to Portal Comments. For more info, see https://docs.microsoft.com/en-us/powerapps/maker/portals/configure/view-all-activities-in-portal-timeline
- Make sure to clear the Portal cache to see your changes.
A few other comments:
- Portal Comments must be marked as resolved/completed to appear on the Portal.
- When a Portal Comment is created by the Portal user, the Portal will display System as the Created By user.
- There isn’t a lot of configuration available to control how activities are displayed. If you need to customize, see these other posts:
Issues with Default tab Setting
If you’re setting up the Timeline metadata on a custom entity, and you just can’t get it to display on the Portal, try changing the Default tab option to something other than Activities, and then change it back.
The Portal code looks at the configuration in the form XML to see if the setting for the Default tab is Activities. When you add the Timeline control to the form, Activities is the default option, and so you see it in the dropdown. My theory is that since it’s the default option, that the value isn’t saved back to the form XML unless a change is made. So to force it to actually save Activities as the Default tab, switch it to something else, save, and then switch it back.
Guest Contributors
I’d like to acknowledge the individuals who have provided invaluable assistance to this series of posts, including providing their comments, insights, experiences and review:
- Nick Doelman (@readyxrm)
- George Dubinski (@georgedude)
- James Novak (@crmdevjim)


Brilliant & thks all
Thanks for the post. I am having trouble on step 6b where I am trying to create an Entity Permission for Portal Comment. I can select the Parent Entity Permission, but, the selector for “Parent Relationship” never populates. It shows a spinny circle.
Update. I did your “Issues with the Default Tab Setting” steps, published, cleared the cache, THEN I was able to fully configure my Portal Comment Entity Permission. Strange.
Can’t thank you enough for the ‘Issues with the Default Tab Setting’ fix.
Hi, any thoughts on how to increase the number of notes displayed within one timeline? the limit is 50 . how can I increase that? thanks
As far as I know, the max of 50 cannot be increased.
Nick
Oh My I’ve been searching whole day why “Add Comment” button didn’t show up. The issue what the step 3 Default tab. Change it to other tab and change it back to Activities it finally worked! Thank you!!!
Above shows the configuration through the old interface. Note that if you try to make Portal Comments work through the new interface, you might only see Notes, not Portal Comments (at this moment in time). Trick for me was to go to use the old interface, change the label from ‘Note Text’ to ‘Note text’ – save – publish. Then the Portal Comments appeared on the Power Pages site.